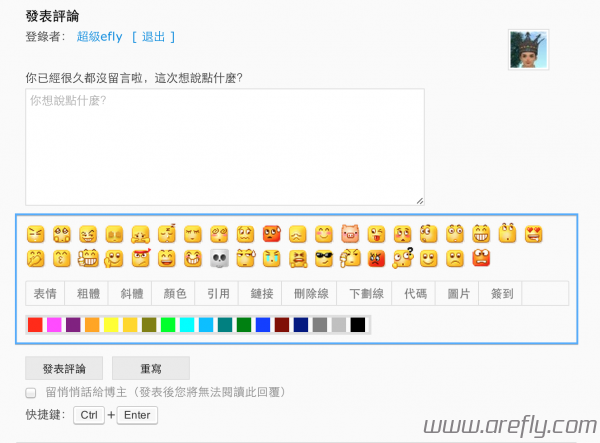
今天來教大家如何給WordPress部落格添加一個實用的評論框小工具,使訪客可以輕而易舉地更改自己評論的格式(字體顔色、粗體、斜體等等),有益於訪客與博主間的互動
一、添加構架(comments.php)
1、打開你的主題文件夾下的「迴響 (comments.php)」
2、在評論框 textarea 上方或下方添加下列代碼
|
1 2 3 4 5 6 7 8 9 10 11 12 13 14 15 16 17 18 19 20 21 22 23 24 25 26 27 28 29 30 31 32 33 34 35 36 37 38 39 40 41 42 |
<div id="smiley"> <?php include(TEMPLATEPATH . '/smiley.php'); //你主題引用表情的文件 /* 如果你使用「Custom Smilies」外掛,請刪除上面那行,並且去除下面這行的注釋 */ //cs_print_smilies(); ?> </div> <div id="editor_tools"> <div id="editor"> <a href="javascript:;" id="comment-smiley"><b>表情</b></a><!-- --><a href="javascript:SIMPALED.Editor.strong()"><b>粗体</b></a><!-- --><a href="javascript:SIMPALED.Editor.em()"><b>斜体</b></a><!-- --><a href="javascript:;" id="font-color"><b>颜色</b></a><!-- --><a href="javascript:SIMPALED.Editor.quote()"><b>引用</b></a><!-- --><a href="javascript:SIMPALED.Editor.ahref()"><b>链接</b></a><!-- --><a href="javascript:SIMPALED.Editor.del()"><b>删除线</b></a><!-- --><a href="javascript:SIMPALED.Editor.underline()"><b>下划线</b></a><!-- --><a href="javascript:SIMPALED.Editor.code()"><b>插代码</b></a><!-- --><a href="javascript:SIMPALED.Editor.img()"><b>插图片</b></a> </div> </div> <div style="padding-top: 10px;"></div> <div id="fontcolor"> <a href="javascript:SIMPALED.Editor.red()" style="background-color: red"></a> <a href="javascript:SIMPALED.Editor.fuchsia()" style="background-color: fuchsia"></a> <a href="javascript:SIMPALED.Editor.purple()" style="background-color: purple"></a> <a href="javascript:SIMPALED.Editor.orange()" style="background-color: orange"></a> <a href="javascript:SIMPALED.Editor.yellow()" style="background-color: yellow"></a> <a href="javascript:SIMPALED.Editor.gold()" style="background-color: gold"></a> <a href="javascript:SIMPALED.Editor.olive()" style="background-color: olive"></a> <a href="javascript:SIMPALED.Editor.lime()" style="background-color: lime"></a> <a href="javascript:SIMPALED.Editor.aqua()" style="background-color: aqua"></a> <a href="javascript:SIMPALED.Editor.deepskyblue()" style="background-color: deepskyblue"></a> <a href="javascript:SIMPALED.Editor.teal()" style="background-color: teal"></a> <a href="javascript:SIMPALED.Editor.green()" style="background-color: green"></a> <a href="javascript:SIMPALED.Editor.blue()" style="background-color: blue"></a> <a href="javascript:SIMPALED.Editor.maroon()" style="background-color: maroon"></a> <a href="javascript:SIMPALED.Editor.navy()" style="background-color: navy"></a> <a href="javascript:SIMPALED.Editor.gray()" style="background-color: gray"></a> <a href="javascript:SIMPALED.Editor.silver()" style="background-color: silver"></a> <a href="javascript:SIMPALED.Editor.black()" style="background-color: black"></a> </div> |
二、添加CSS樣式
1、這個沒啥好說的,就是添加外觀
2、將以下代碼添加至「樣式表 (style.css)」
|
1 2 3 4 5 6 7 8 9 10 11 12 13 14 15 16 17 18 19 20 21 22 23 24 25 26 27 28 29 30 31 32 33 34 35 36 37 |
/** 評論工具 **/ #smiley{ padding-bottom: 10px; } #editor_tools{ display: inline-block; height: 26px; line-height: 26px; border: 1px #e0e0e0 solid; border-radius: 2px 2px 0 0; overflow: hidden; z-index: 99999; } #editor_tools a{ color: #777; display: inline-block; padding: 0 8px; height: 26px; border-right: 1px solid #ddd; } #editor_tools a:hover{ color: #333; text-decoration: none; } #fontcolor{ display: inline-block; height: 16px; line-height: 20px; border: 2px #e0e0e0 solid; z-index: 99999; padding: 2px; } #fontcolor a{ display: inline-block; height: 16px; width: 16px; } |
三、添加最重要的JS代碼
1、最重要的「添加JS代碼」來啦! ![]()
2、在你的主題目錄下新建一個名為「js」的文件夾(如果已有請忽略)
3、在「js」文件夾內新建一個名為「comments.js」的文件
4、在此文件內添加以下代碼:
|
1 2 3 4 5 6 7 8 9 10 11 12 13 14 15 16 17 18 19 20 21 22 23 24 25 26 27 28 29 30 31 32 33 34 35 36 37 38 39 40 41 42 43 44 45 46 47 48 49 50 51 52 53 54 55 56 57 58 59 60 61 62 63 64 65 66 67 68 69 70 71 72 73 74 75 76 77 78 79 80 81 82 83 84 85 86 87 88 89 90 91 92 93 94 95 96 97 98 99 100 101 102 103 104 105 106 107 108 109 110 111 112 113 114 115 116 117 118 119 120 121 122 123 124 125 126 127 128 129 130 131 132 133 134 135 136 137 138 139 140 141 |
jQuery(function(){ jQuery("#smiley").hide(500); jQuery("#comment-smiley").click(function(){ jQuery("#smiley").toggle(500); }); }); jQuery(function(){ jQuery("#fontcolor").hide(500); jQuery("#font-color").click(function(){ jQuery("#fontcolor").toggle(500); }); }); jQuery(function(){ jQuery("#smiley").hide(); jQuery("#comment").click(function(){ }); }); jQuery(function(){ jQuery("#fontcolor").hide(); jQuery("#comment").click(function(){ }); }); jQuery(function() { function addEditor(a, b, c) { if (document.selection) { a.focus(); sel = document.selection.createRange(); c ? sel.text = b + sel.text + c: sel.text = b; a.focus() } else if (a.selectionStart || a.selectionStart == '0') { var d = a.selectionStart; var e = a.selectionEnd; var f = e; c ? a.value = a.value.substring(0, d) + b + a.value.substring(d, e) + c + a.value.substring(e, a.value.length) : a.value = a.value.substring(0, d) + b + a.value.substring(e, a.value.length); c ? f += b.length + c.length: f += b.length - e + d; if (d == e && c) f -= c.length; a.focus(); a.selectionStart = f; a.selectionEnd = f } else { a.value += b + c; a.focus() } } var myDate = new Date(); var mytime=myDate.toLocaleTimeString() var g = document.getElementById('comment') || 0; var h = { strong: function() { addEditor(g, '<b>', '</b>') }, em: function() { addEditor(g, '<i>', '</i>') }, del: function() { addEditor(g, '<del>', '</del>') }, underline: function() { addEditor(g, '<u>', '</u>') }, quote: function() { addEditor(g, '<blockquote>', '</blockquote>') }, ahref: function() { var a = prompt('請輸入鏈接地址', 'http://'); var b = prompt('請輸入鏈接內容', ''); if (a) { addEditor(g, '<a href="' + a + '">' + b + '</a>', '') } }, img: function() { var a = prompt('請輸入圖片地址', 'http://'); if (a) { addEditor(g, '<img src="' + a + '" />', '') } }, sign: function() { addEditor(g, '今天簽到啦!時間:' + mytime, '') }, code: function() { addEditor(g, '<pre>', '</pre>') }, red: function() { addEditor(g, '<span style="color: red">', '</span>') }, fuchsia: function() { addEditor(g, '<span style="color: fuchsia">', '</span>') }, purple: function() { addEditor(g, '<span style="color: purple">', '</span>') }, orange: function() { addEditor(g, '<span style="color: orange">', '</span>') }, yellow: function() { addEditor(g, '<span style="color: yellow">', '</span>') }, olive: function() { addEditor(g, '<span style="color: olive">', '</span>') }, lime: function() { addEditor(g, '<span style="color: lime">', '</span>') }, maroon: function() { addEditor(g, '<span style="color: maroon">', '</span>') }, aqua: function() { addEditor(g, '<span style="color: aqua">', '</span>') }, teal: function() { addEditor(g, '<span style="color: teal">', '</span>') }, green: function() { addEditor(g, '<span style="color: green">', '</span>') }, blue: function() { addEditor(g, '<span style="color: blue">', '</span>') }, navy: function() { addEditor(g, '<span style="color: navy">', '</span>') }, gray: function() { addEditor(g, '<span style="color: gray">', '</span>') }, deepskyblue: function() { addEditor(g, '<span style="color: deepskyblue">', '</span>') }, gold: function() { addEditor(g, '<span style="color: gold">', '</span>') }, silver: function() { addEditor(g, '<span style="color: silver">', '</span>') }, black: function() { addEditor(g, '<span style="color: black">', '</span>') } }; window['SIMPALED'] = {}; window['SIMPALED']['Editor'] = h }); |
5、然後在「header.php」內引用這個JS
|
1 |
<script src="<?php bloginfo('template_directory'); ?>/js/comments.js"></script> |
預覽
參考資料
WordPress – 为评论框添加简易编辑器,如表情、粗体、斜体、引用(簡體)
總結
1、其實所有這些功能你都可以自己修改,不過要記得同時修改JS代碼及PHP代碼 ![]()
2、有問題可以回覆問我 ![]()
